Assembling Azure keys.yaml and config.yaml
We have automated most of the work involved in creating the keys.yaml and config.yaml files that you will need in order to run the Azure example appliances.
But there are manual steps required in order to validate in the Azure portal to determine whether or not the automated CLI commands have been implemented by Azure before you can run the example appliances.
Use the same keys.yaml and config.yaml for each of the AZURE example appliances. We automated creation of keys and config for all the AZURE appliances so that you will not be required to repeat the manual steps more than once.
Four videos on this page each give you illustrations of how to perform each of the steps that are described in writing below.
This article is divided into 4 sections as follows:
- Section One: Configuring Azure
- Section Two: Azure Subscription Owner Role
- Section Three: Azure Active Directory Global Administrator Role
- Section Four: Azure Active Directory Application Administrator Role
Section One: Configuring Azure
Step One:
Log into portal.azure.com as an account owner. You must log into Azure as the highest super user to create these credentials in order to get the example appliances working the first time. Later, you can experiment with tightening the security after the example appliances are working for you.
Step Two:
Create a new subscription with a single word name. For example, if you need multiple words in a name, use camel-case such as, for example, MySubscriptionName. Then paste the subscriptionId and subscriptionName into a text file.
Step Three:
Navigate to the Azure Active Directory associated with the new subscription. Then paste the tenantId for that Active Directory into the same text file.
Step Four:
Open a cloud shell by clicking the cloud shell icon at the top of the screen, as shown in the following screen shot.

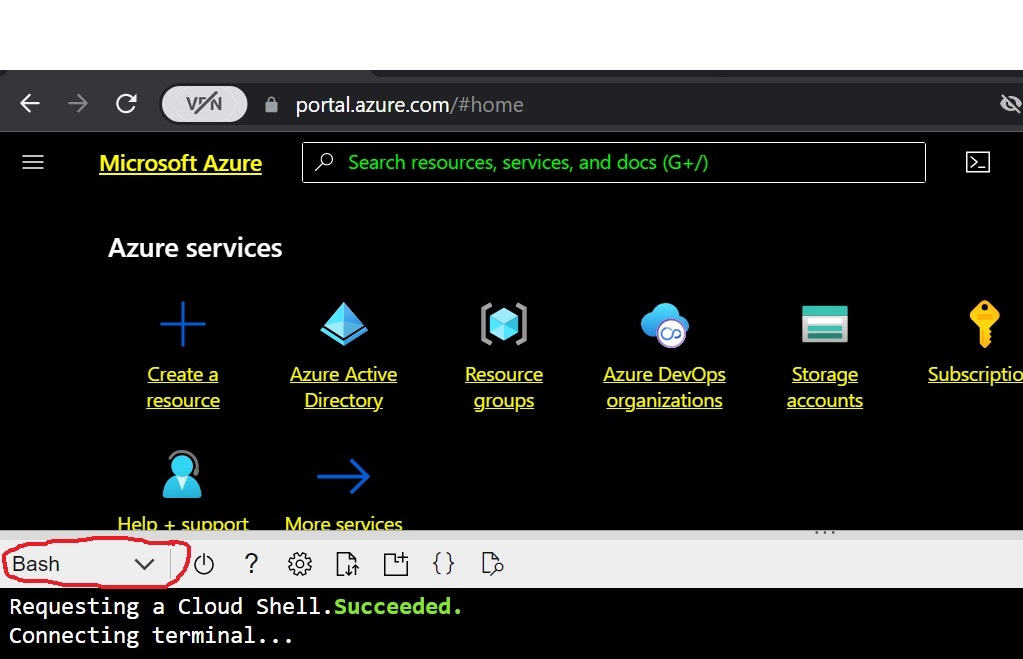
Step Five:
Select bash as the shell for simplicity, as shown in the following screen shot.
Step Six:
Type “az –version” in the cloudshell terminal. This was tested in version 2.48, with Python 3.9. If you later encounter problems, please note the version with the exact steps you followed, and open an issue so that we can help you.
Step Seven:
Download this script and a dependent arm template into your Azure cloud shell by typing the following into the cloud shell terminal:
wget https://github.com/AgileCloudInstitute/acm-demos-github/blob/main/acmDemoSetup.py?raw=true -O acmDemoSetup.py

wget https://github.com/AgileCloudInstitute/acm-demos-github/blob/main/subscriptionScopeRole.json?raw=true -O subscriptionScopeRole.json
Step Eight:
Confirm that the files have been successfully downloaded by typing “ls -al” and looking for the file name in the results. Make sure you do not have multiple copies remaining from previous downloads. If you have redundant copies, then delete all of them with the rm command and then re-run the two “wget” commands from step seven to get the newest versions. If there are old copies of config.yaml and keys.yaml, then back the old copies up somewhere else and delete them from the cloudshare with the rm command to avoid downstream errors below.
Step Nine:
Paste the subscriptionId, subscriptionName, and tenantId values from steps 2 and 3 above into the following command. Make sure that your subscription name does NOT contain spaces. For example, camel case as in subscriptionName=MySubscriptionName is a good way to convey meaning without including spaces in your subscription name. Then, after you have put the correct values for subscriptionId, subscriptionName, and tenantId in place, run the following command to automatically create a keys.yaml and config.yaml populated with valid azure credentials that will be needed for the demo.
python acmDemoSetup.py create azurefiles subscriptionId=valid-subscription-id-guid subscriptionName=validSubscriptionName tenantId=valid-active-directory-tenant-id appRegistrationName=myappregtest1 clientSecretName=mycert2 clientSecretEndDate=2024-12-31
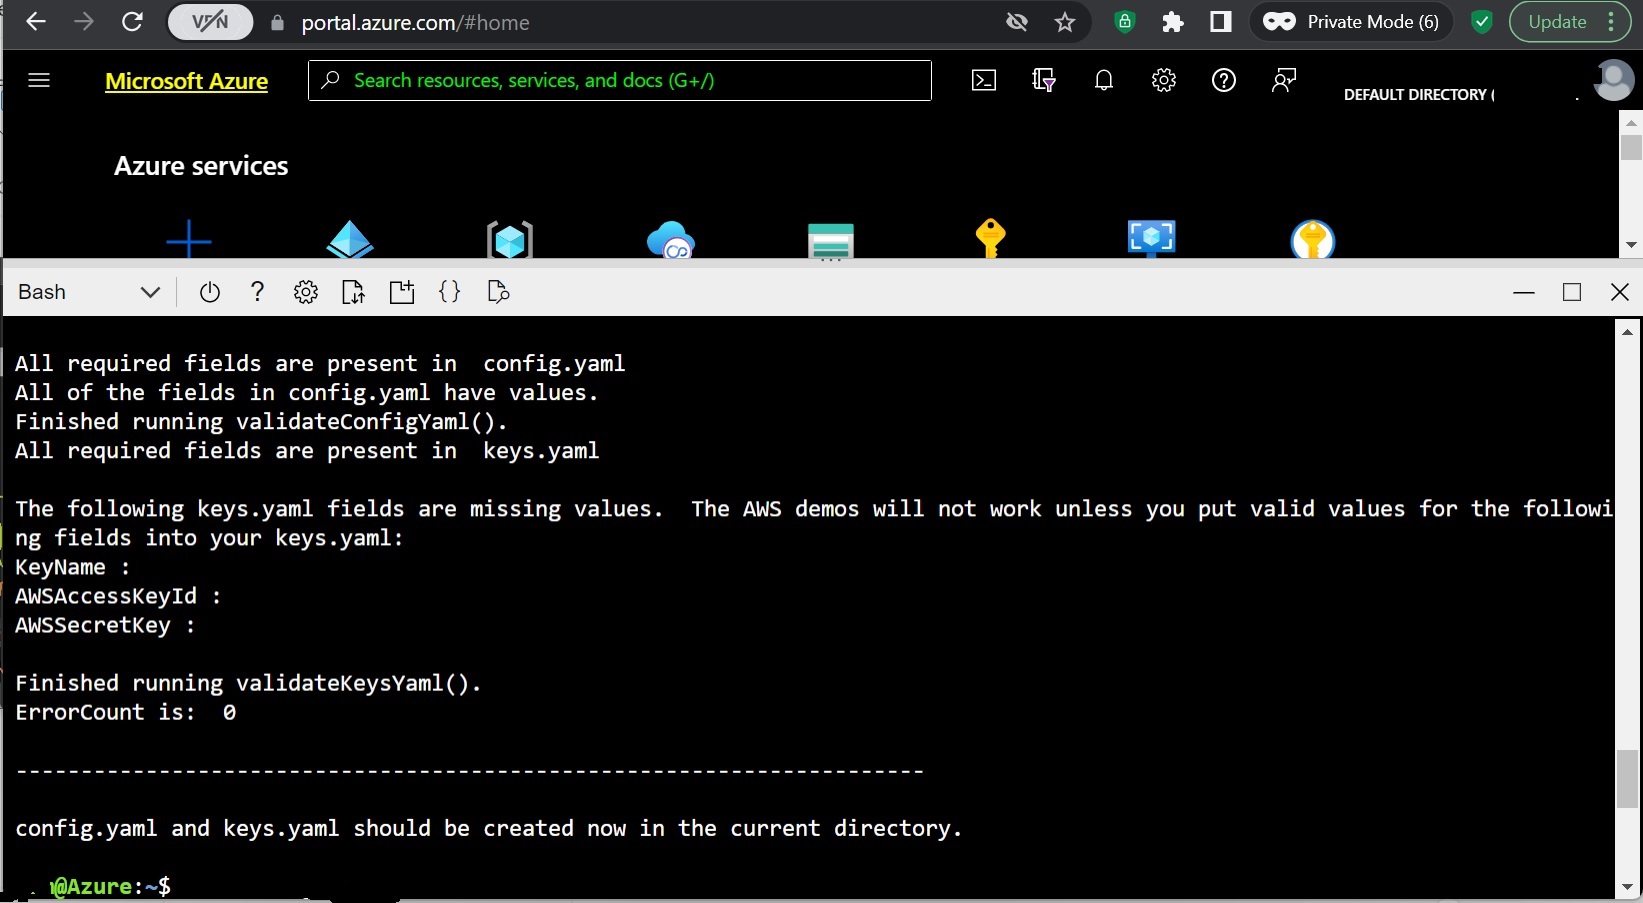
Step Ten:
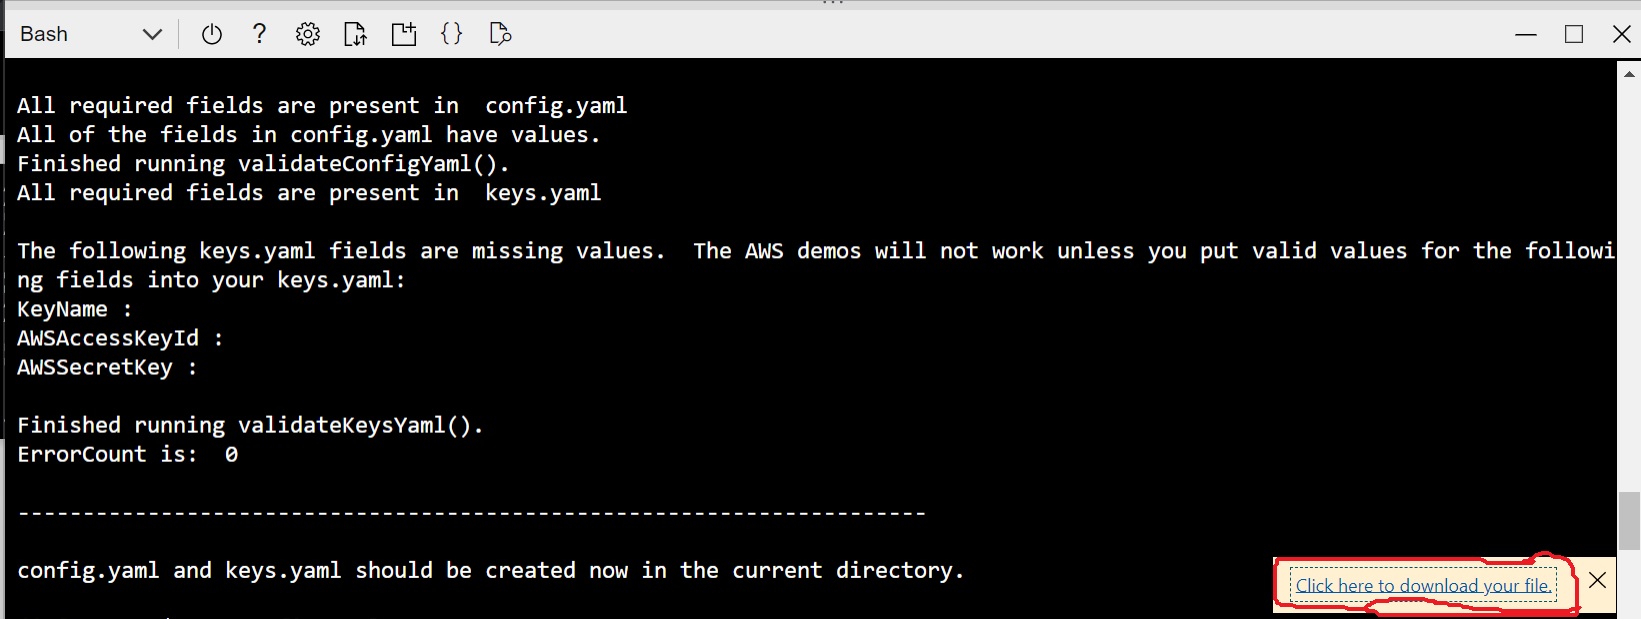
Confirm the command completed without errors by reviewing the results as shown in the following screen shot. Things to check include:
- All required fields are present in config.yaml
- All fields in config.yaml have values
- All required fields are present in keys.yaml
- Three specific AWS keys have missing values as shown in the screen shot, because this is the Azure shell and you can ignore those AWS placeholders.
- ErrorCount is 0
- config.yaml and keys.yaml should be created now in the current directory.
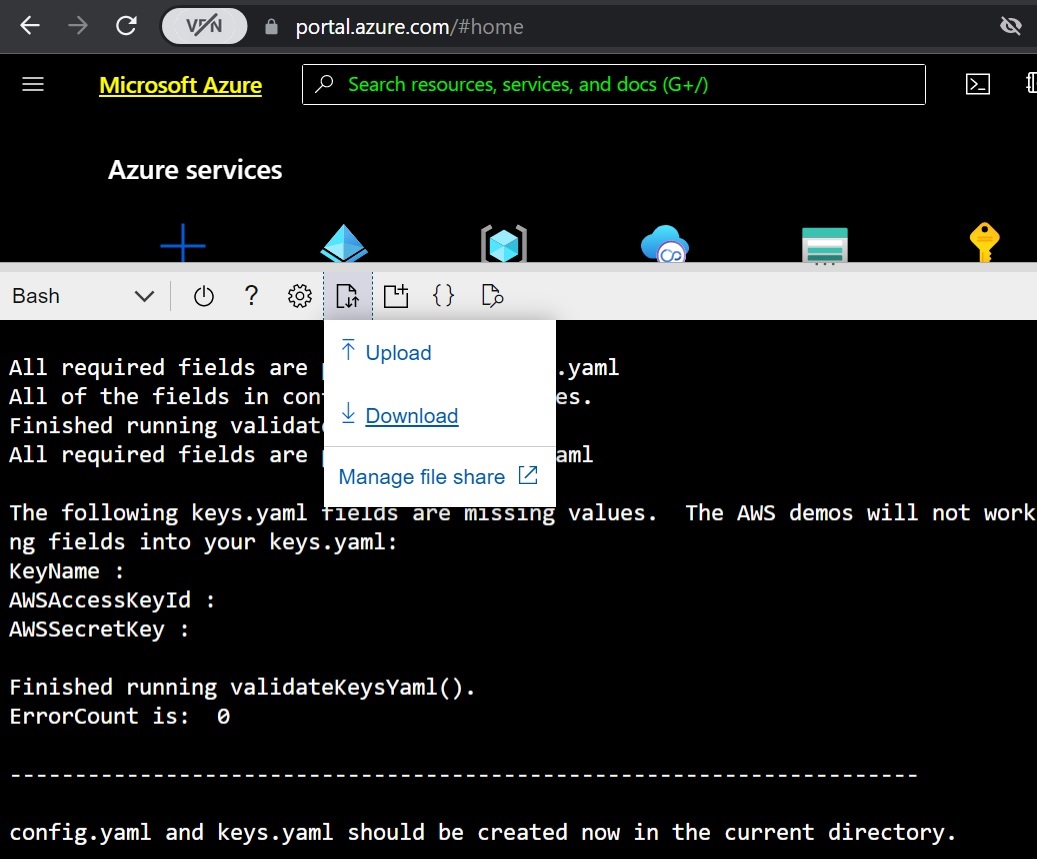
Step Eleven:
Click the download button as shown in the next screen shot.
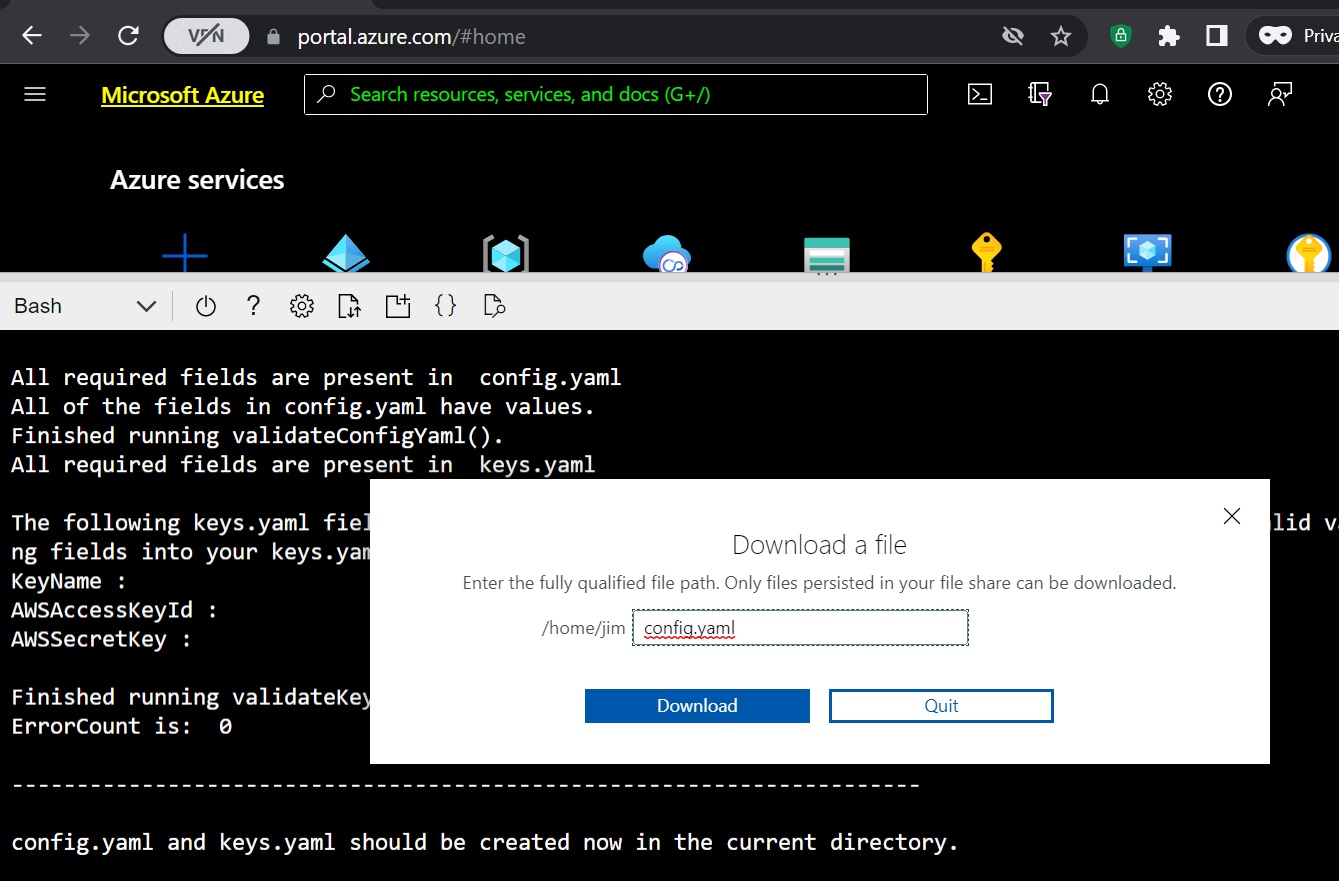
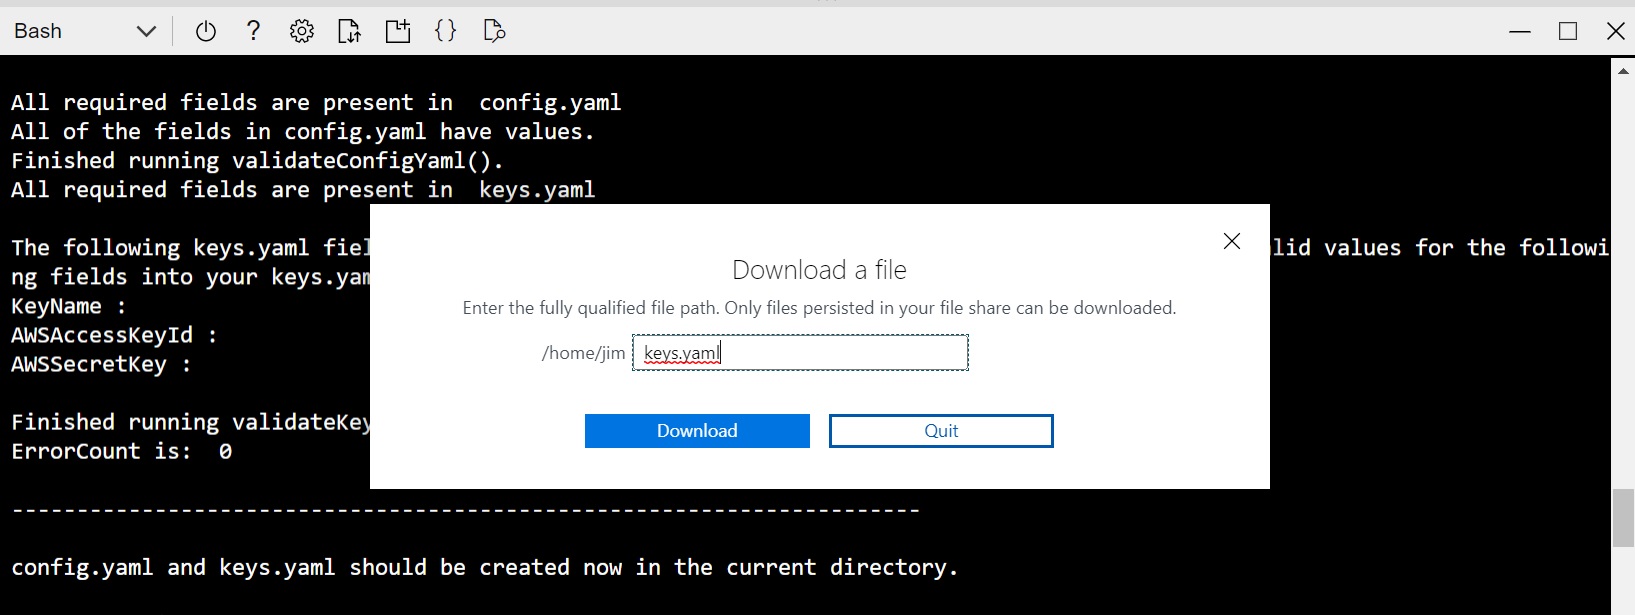
Step Twelve:
Type in “config.yaml” in the resulting modal to select the config.yaml file for download, as shown in next screen shot.
Step Thirteen:
Then click on the “Click here to download file” link that will appear as shown in the following screen shot.
Step Fourteen:
Confirm that config.yaml has been downloaded into the Downloads folder of your local computer.
Do not alter the contents of config.yaml, because their precise machine-generated format is required for the demos to work properly.
Step Fifteen:
Click the download button in the Azure Cloud Shell again as you did in step 11 above.
Step Sixteen:
Type in “keys.yaml” (without quotes) in the resulting modal to select the keys.yaml file for download, as shown in the next screen shot.
Step Seventeen:
Click on the “Click here to download file” link which will appear at the bottom right of the screen, as shown in the next screen shot.
Step Eighteen:
Confirm that the keys.yaml file has been downloaded into the downloads file on your local computer. You will see that it contains valid Azure values, but that it is still missing three AWS values which you can ignore because this demo will not use AWS.
DO NOT ALTER THE CONTENTS OF keys.yaml BECAUSE THE PRECISE, MACHINE-GENERATED FORMAT IS NECESSARY FOR THE DEMOS TO RUN PROPERLY.
Step Nineteen:
Move keys.yaml and config.yaml to a safe location outside the Downloads folder.
Section Two: Azure Subscription Owner Role
Confirm whether the subscription Owner role has been assigned to the app registration you created.
Step One:
Open a separate tab in your browser and navigate inside portal.azure.com to the subscription in which you created the resources.
Step Two:
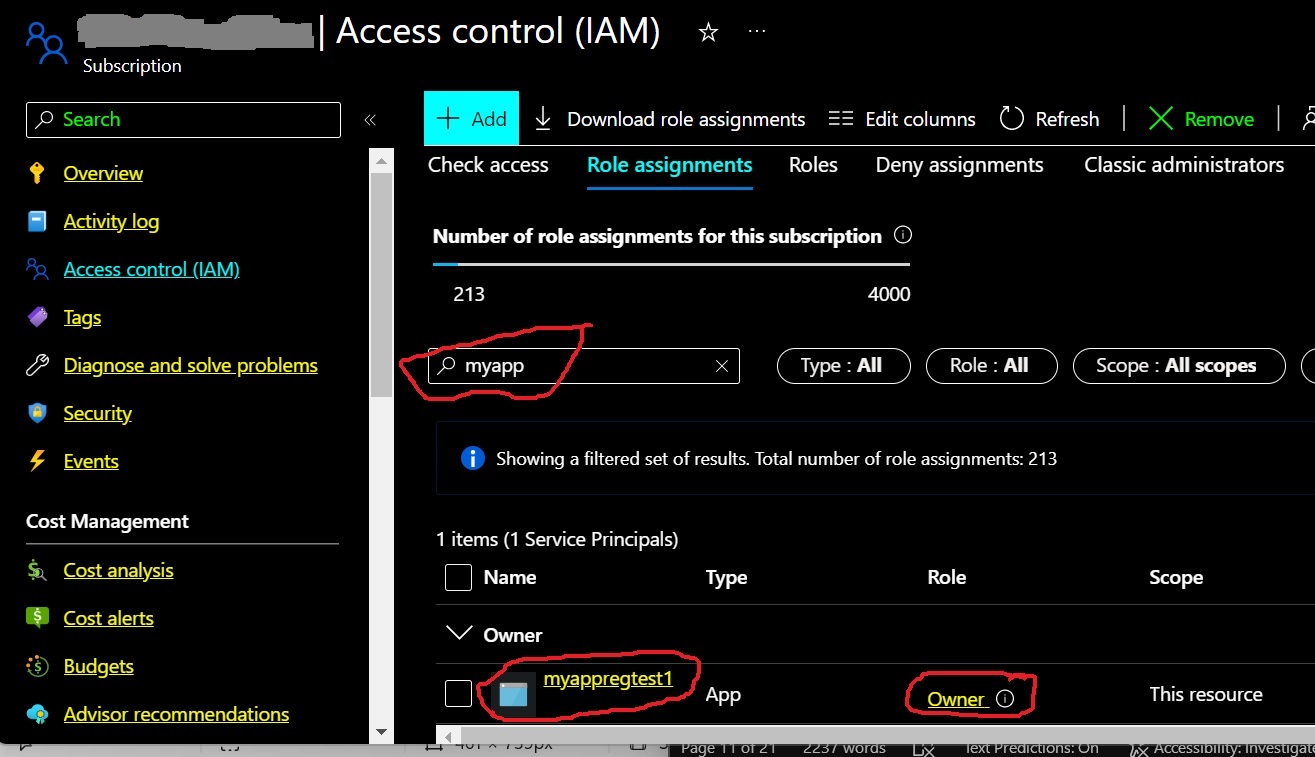
On the Subscription’s main page, look on the left-hand navigation panel for “Access Control (IAM)” and click on it. Then on the resulting main panel details page, click on the “Role assignments” link to make the role assignments search tool visible. Type the first several letters of the app registration name you entered in the cli command and, if necessary, click on the “Refresh” tab on top to update the search.
The app registration will have the same name given in your keys.yaml file for clientName.
If you do not see the app registration listed with the “Owner” role for the subscription, then you must manually assign the subscription owner role.
The following diagram shows all of the parts of Step Two, and illustrates a situation where the subscription owner role is not showing as assigned even though the Azure CLI reports that the role was assigned. The words “No user assignments exist” in the screen shot indicate that the Owner role was not assigned to any app registration whose name begins with the “myapp” string you used in the search box.
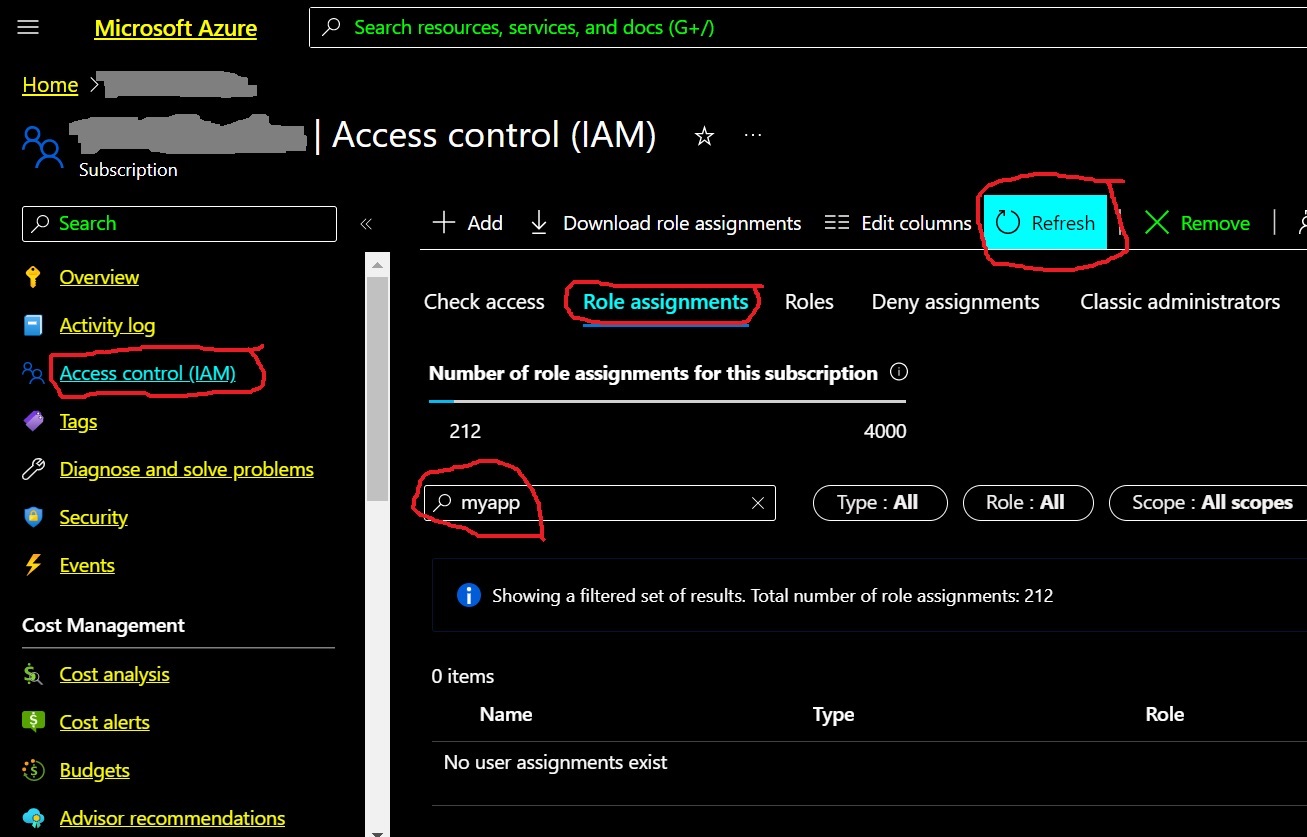
If you get similar results showing that the “Owner” role for the subscription has not been assigned, you must manually assign the subscription Owner role in the portal.azure.com GUI.
Step Three:
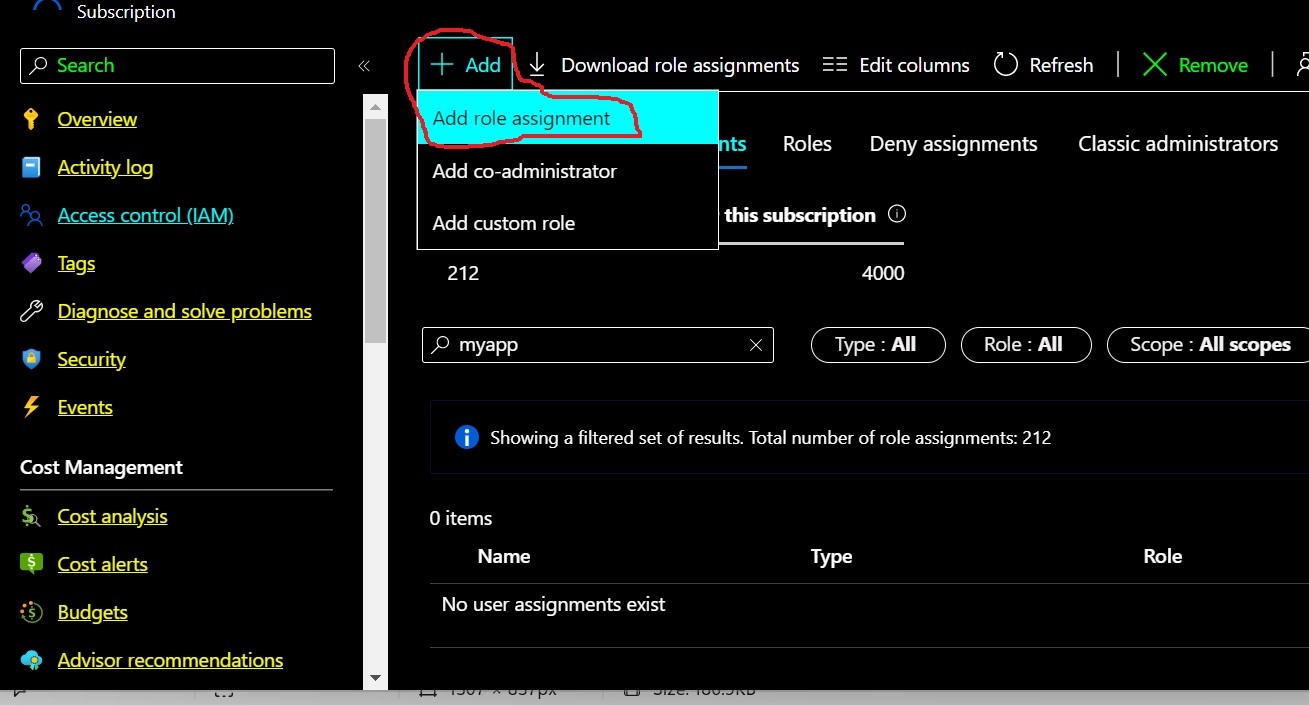
You can manually assign the subscription Owner role by clicking on the “Add” button and choosing the “Add role assignment” option as shown in the following screen shot.
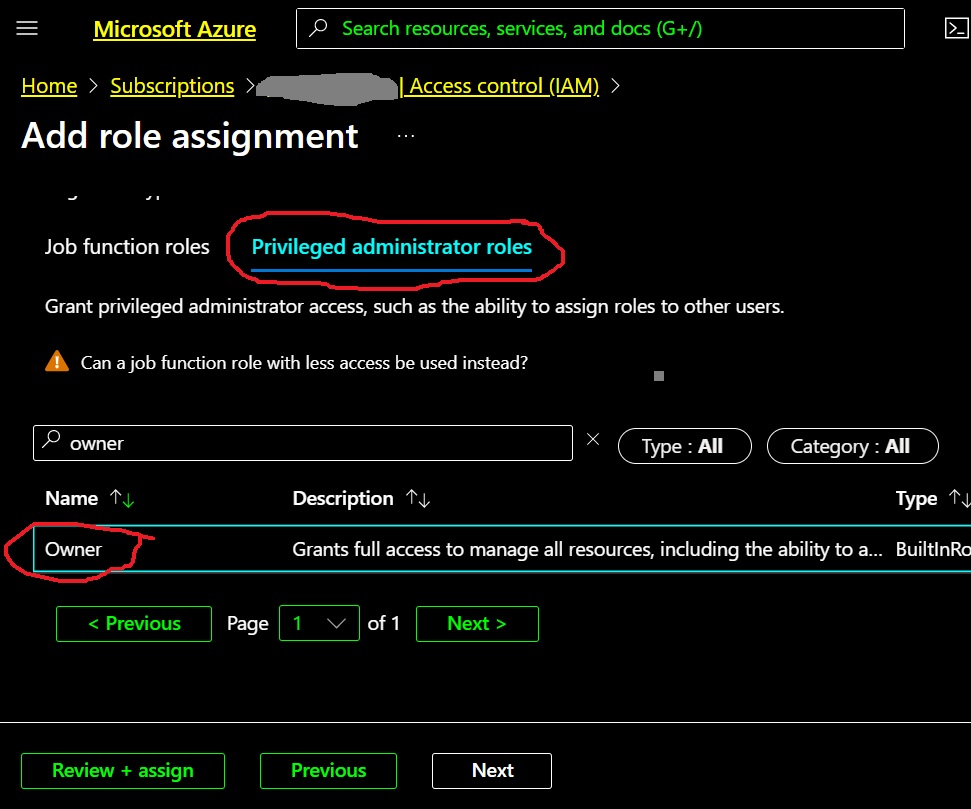
Step Four:
On the resulting “Add role assignment” page, click on the “Privileged administrator roles” tab, and then type “owner” into the resulting search box to filter the available roles. Select the “Owner” role from the resulting list of roles, and then click the “Next” button as shown in the following screen shot.
(Note that these are temporary credentials you can destroy after running the example appliances each time. You need a super user here to make sure that the example appliances work perfectly. Later, you can experiment with lower role assignments to tighten security after you have gotten the example appliances to work.)
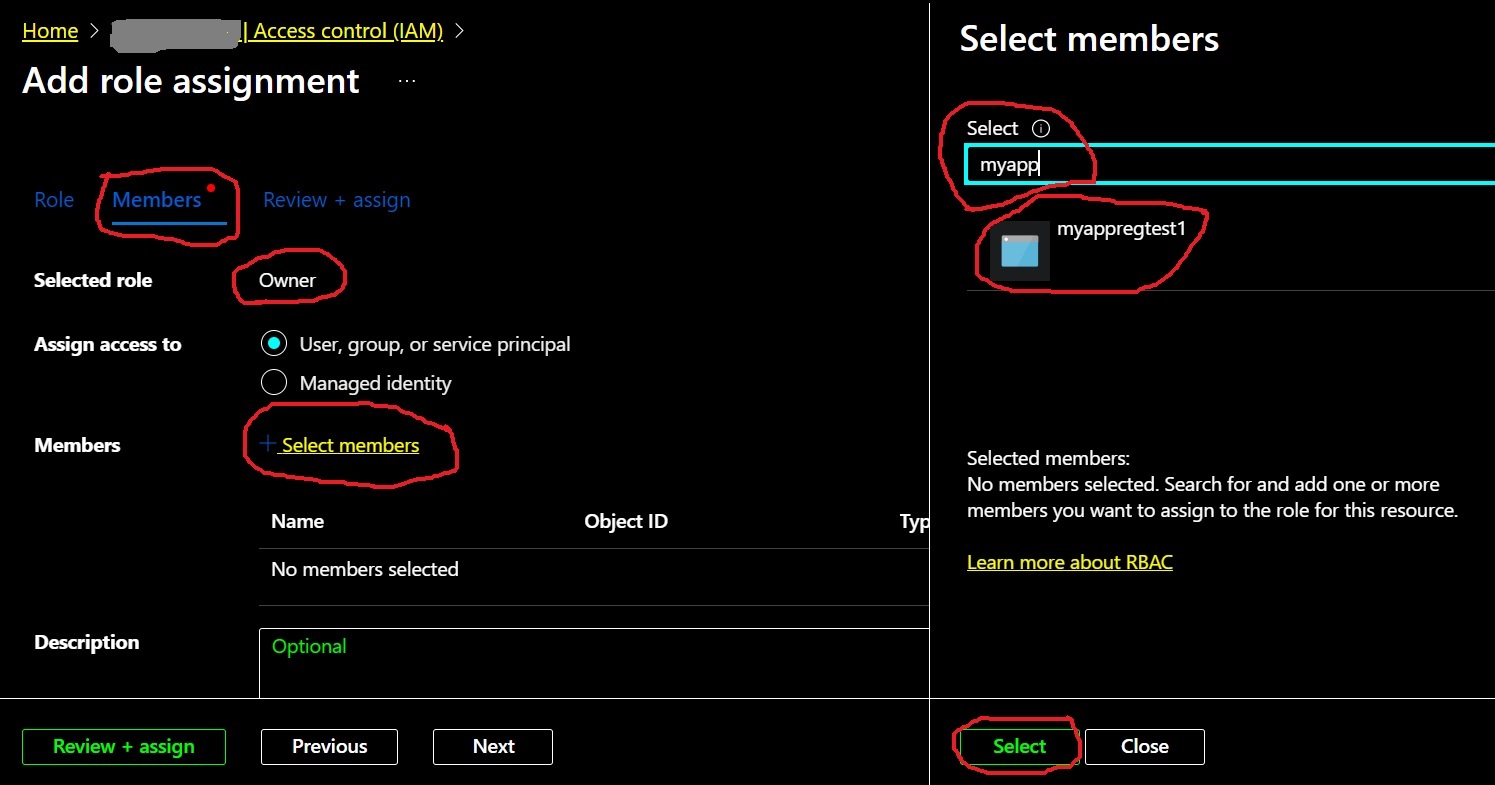
Step Five:
On the resulting “Members” subtab, make sure that “Owner” was selected, then click the “Select members” link and, in the resulting modal, type the first few letters of the name of the app registration that you created. Then select it in the results and click the “Select” button on the bottom left to select the member to assign the role. All these actions are illustrated by red highlighted sections of the following screen shot.
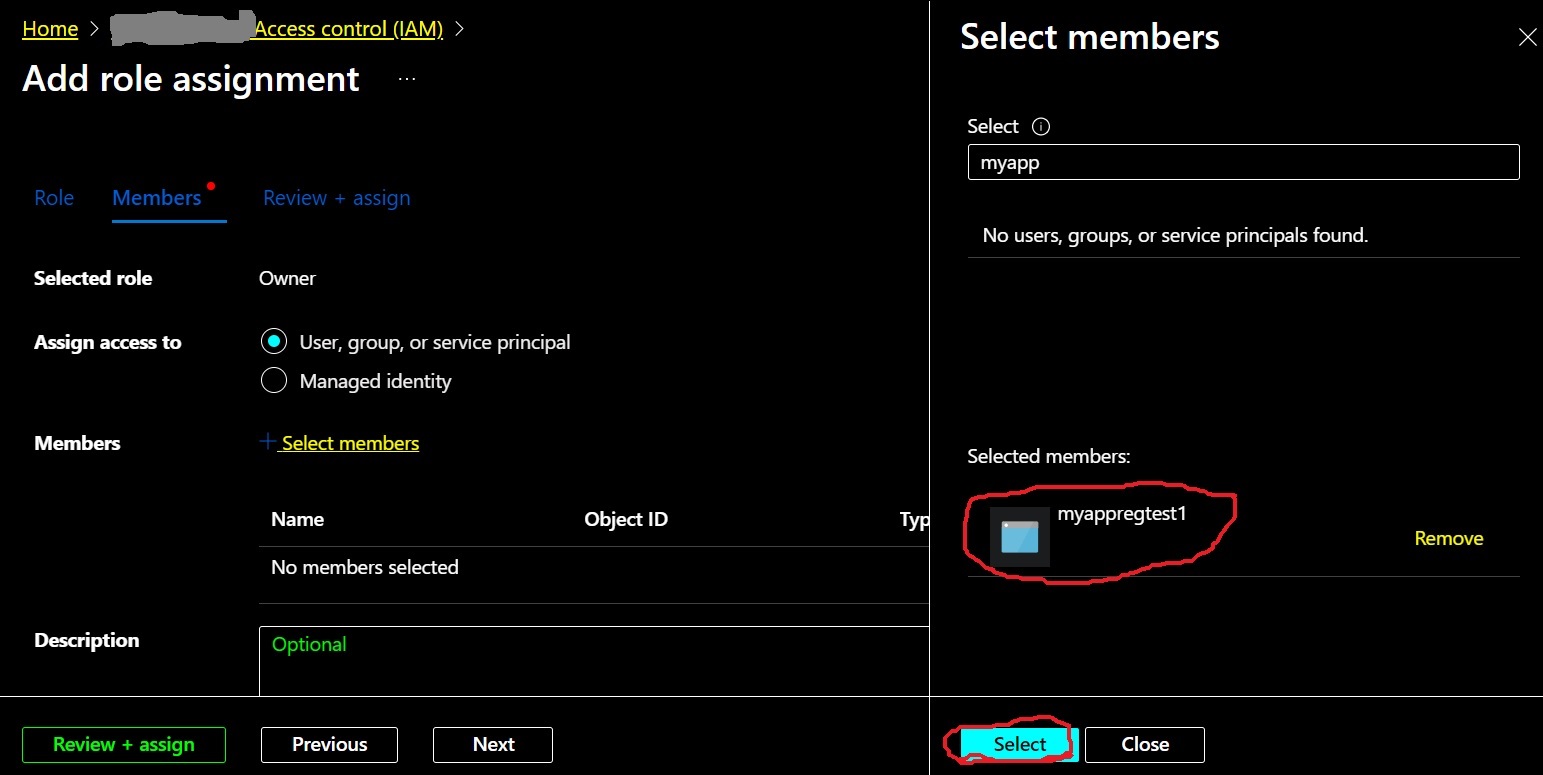
Step Six:
The next screen shot illustrates how the screen will look after you select the app registration. Click on the “Select” button after you select the app registration by name as shown in the following.
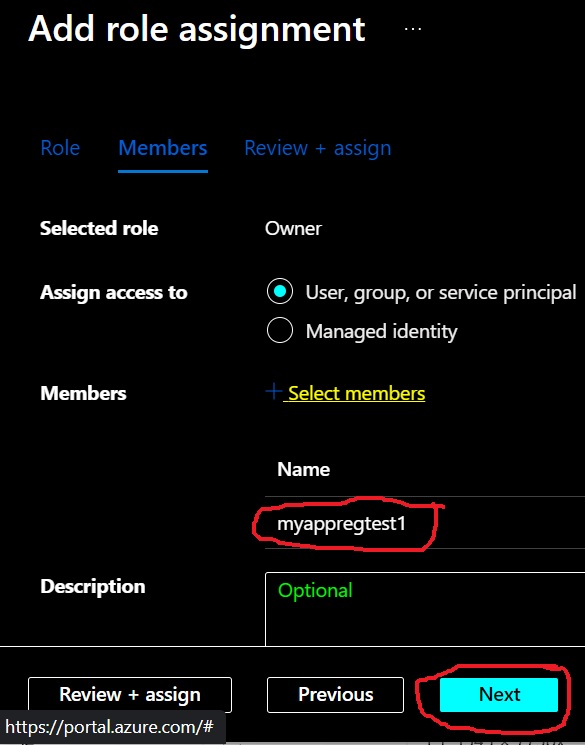
Step Seven:
On the resulting screen, confirm that the app registration’s name is listed in the “Members” and click on the “Next” button as shown in the following screen shot.
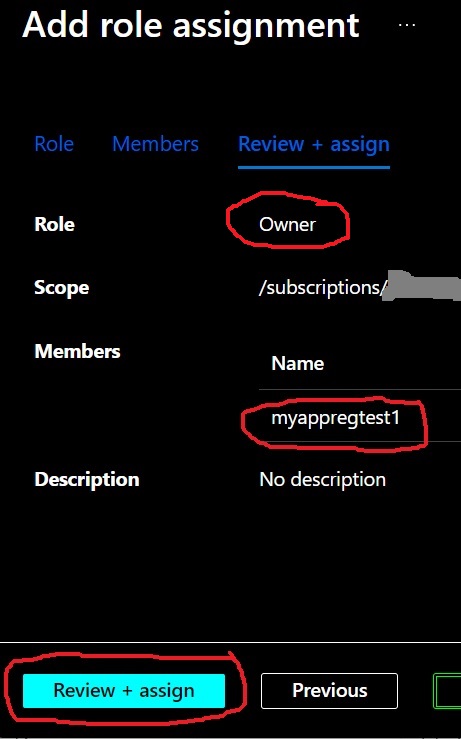
Step Eight:
On the resulting “Review+Assign” page, confirm that the “Owner” role and the correct app registration name were selected, and then click the “Review+Assign” button as shown in the following screen shot.
Step Nine:
On the resulting main “Role assignments” page, confirm that the “Owner” role has been assigned to the proper name of the app registration that you created. The following screen shot shows how this should look.
Section Three: Azure Active Directory Global Administrator Role
Confirm that Active Directory roles have been assigned to the app registration you created. The required roles are “Global Administrator” and “Application Administrator”.
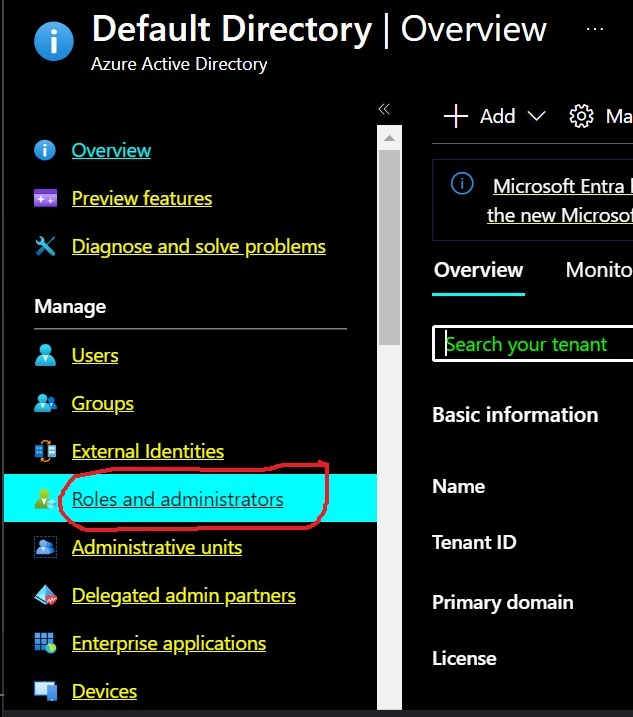
Step One:
Start by navigating to the Active Directory Tenant’s main page and clicking on the “Roles and administrators” tab as shown in the following screen shot.
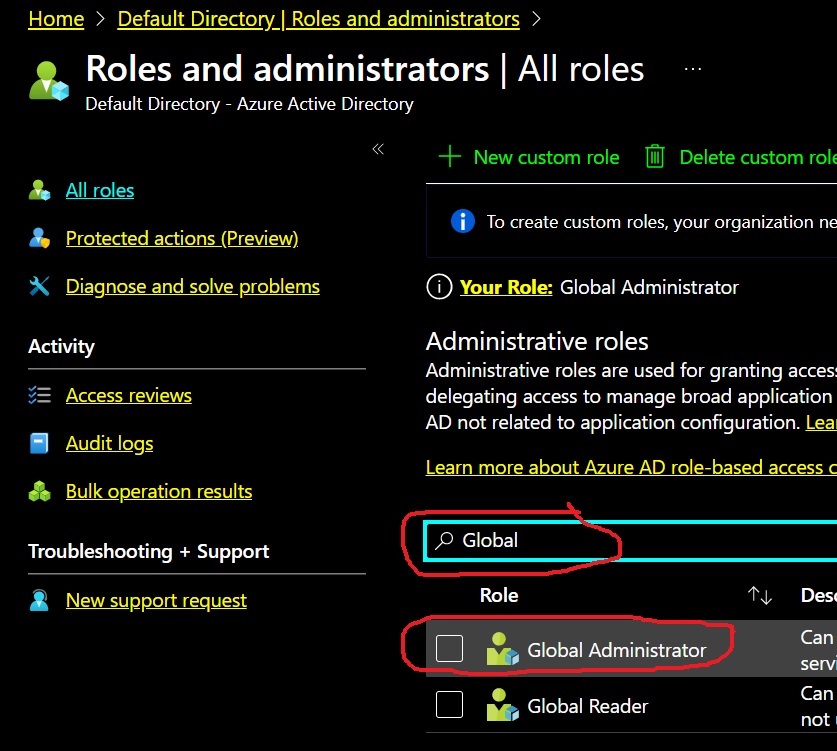
Step Two:
On the resulting page, search for “Global” and click on the “Global Administrator” role as shown in the following screen shot.
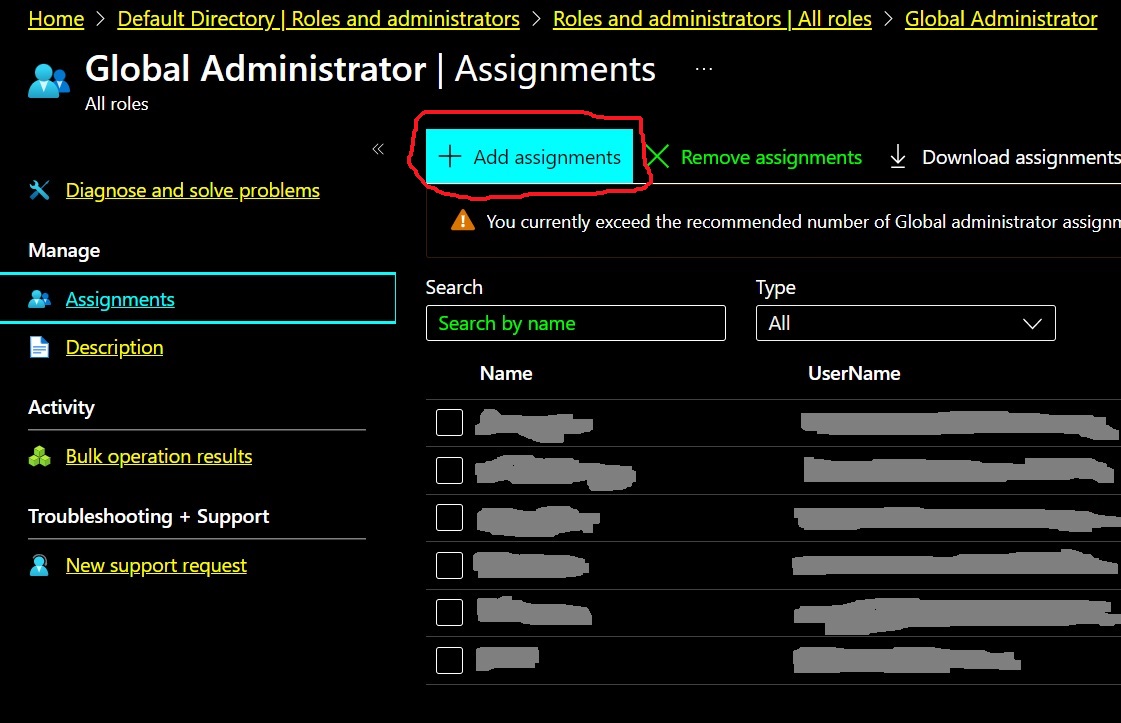
Step Three:
On the resulting Global Administrator page, check to see if the name of the app registration that you created is listed among the assignees. If it is NOT listed, then click on the “Add assignments” link as shown in the following screen shot.
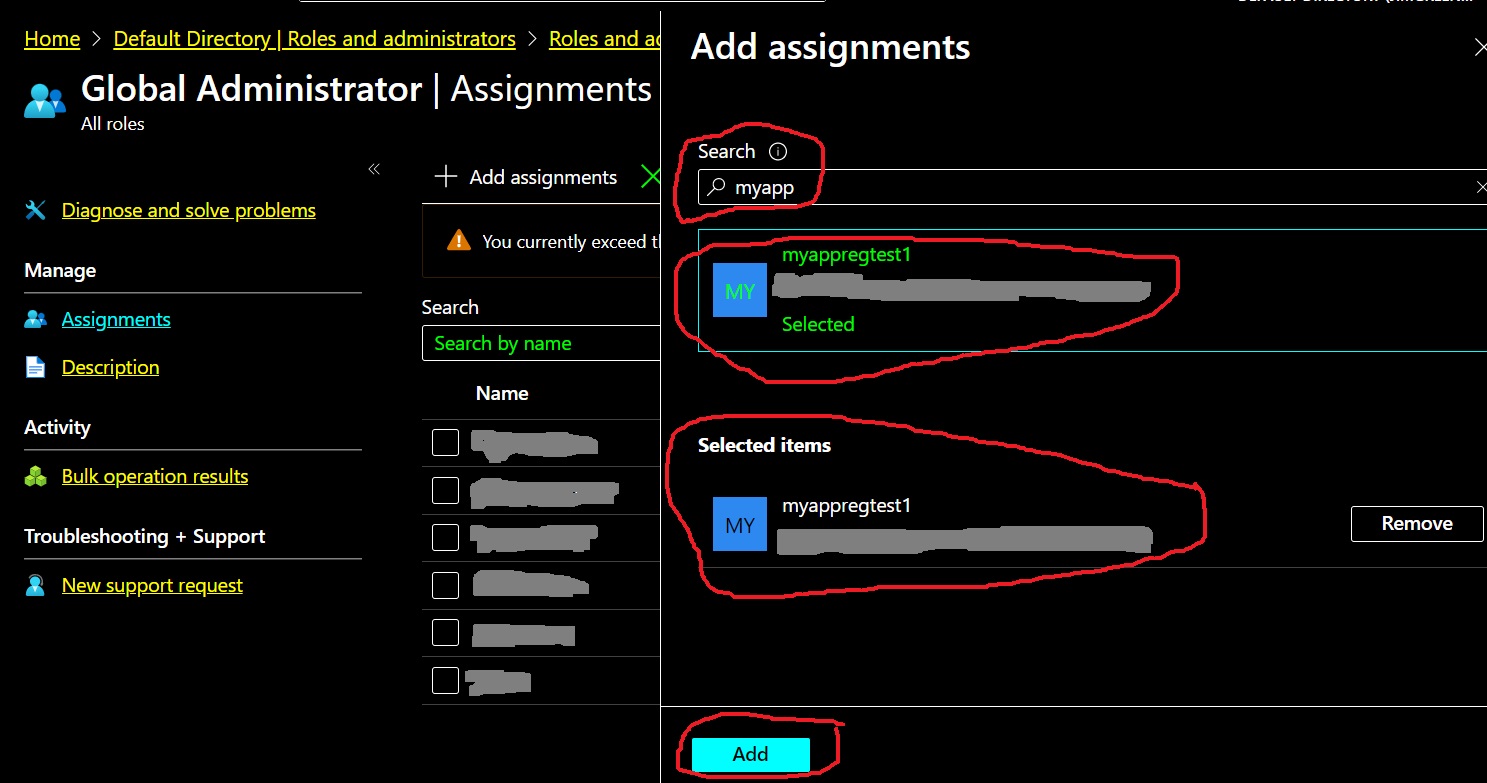
Step Four:
On the resulting “Add Assignments” page, search for the name of the app registration you created, then click to select it from the results, and then click the “Add” button, as shown in the following screen shot.
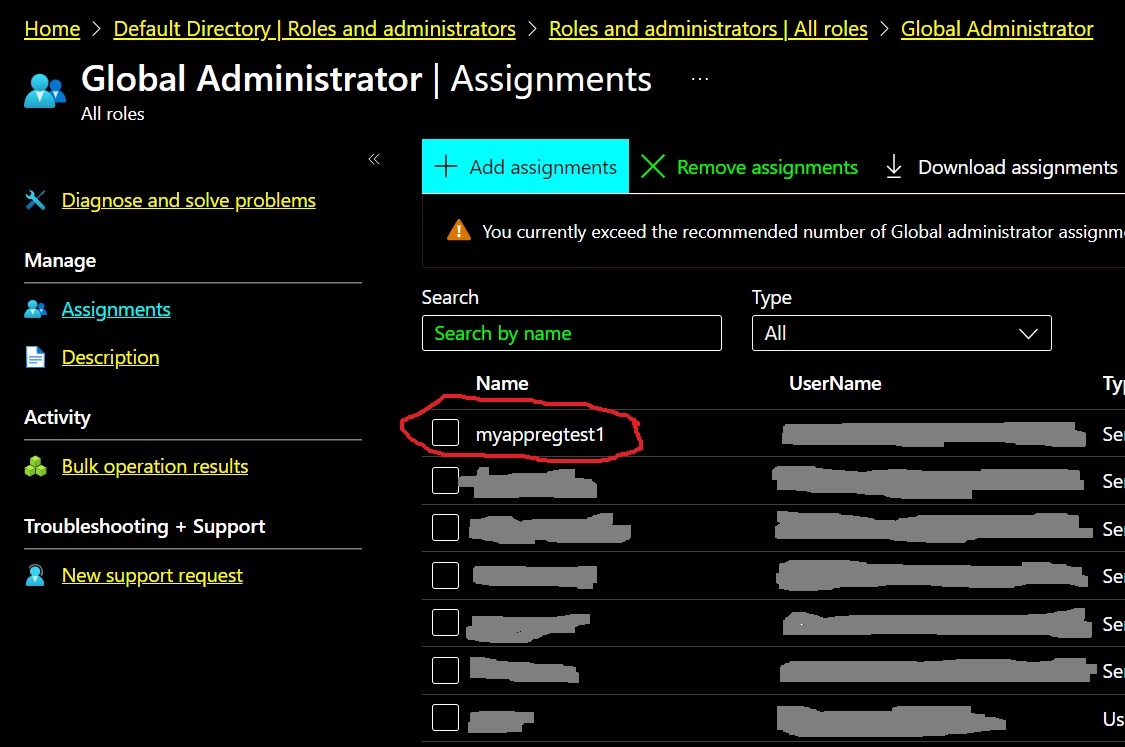
Step Five:
Your new app registration should now be listed among the members of the “Global Administrator” role on the resulting “Global Administrator | Assignments” page as shown in the following screen shot.
Section Four: Azure Active Directory Application Administrator Role
Confirm that the “Application Administrator” role has been assigned to your app registration in the Active Directory tenant.
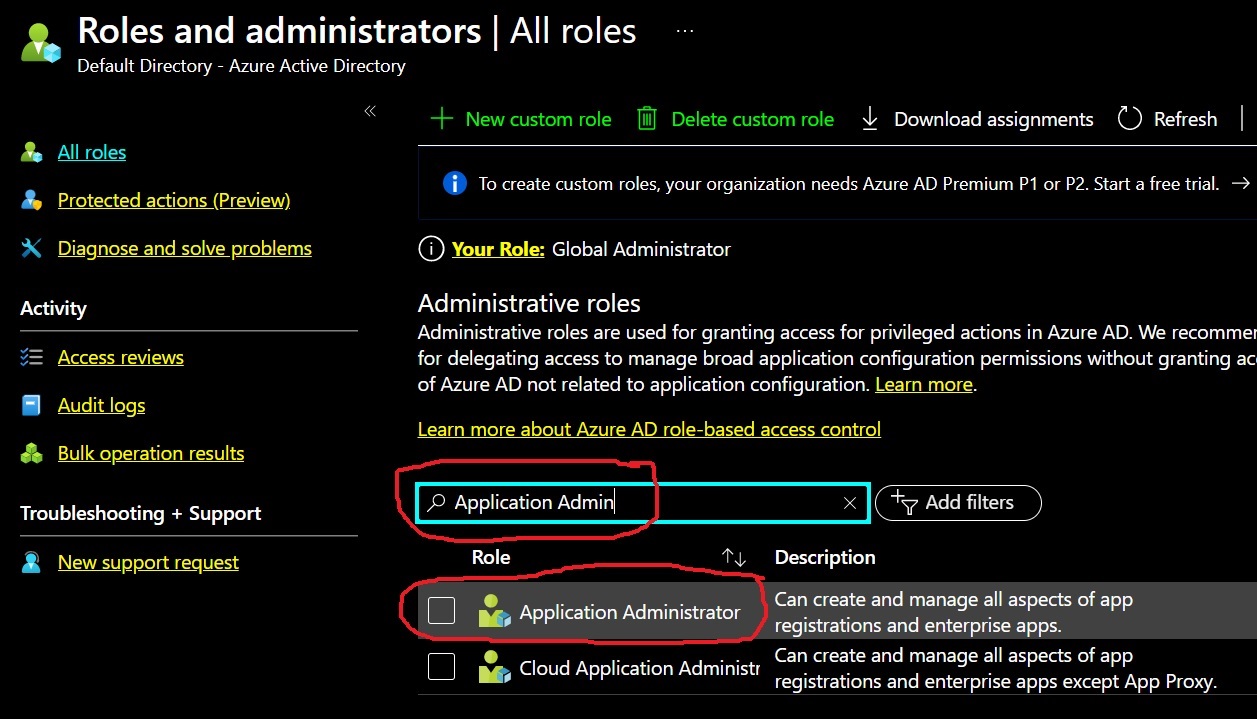
Step One:
Navigate to the “Roles and administrators | All roles” page, then search for the “Application Administrator” role and then click on the role in the results, as shown in the following screen shot.
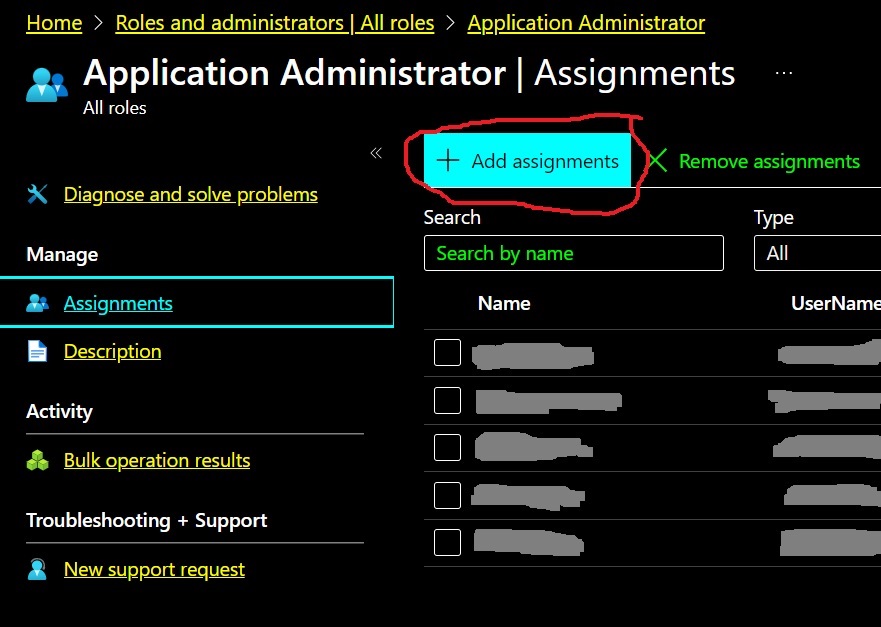
Step Two:
If your app registration’s name is not included in the list of assignees on the resulting “Application Administrator | Assignments” detail page, then click on the “Add assignments” button as shown in the following screen shot.
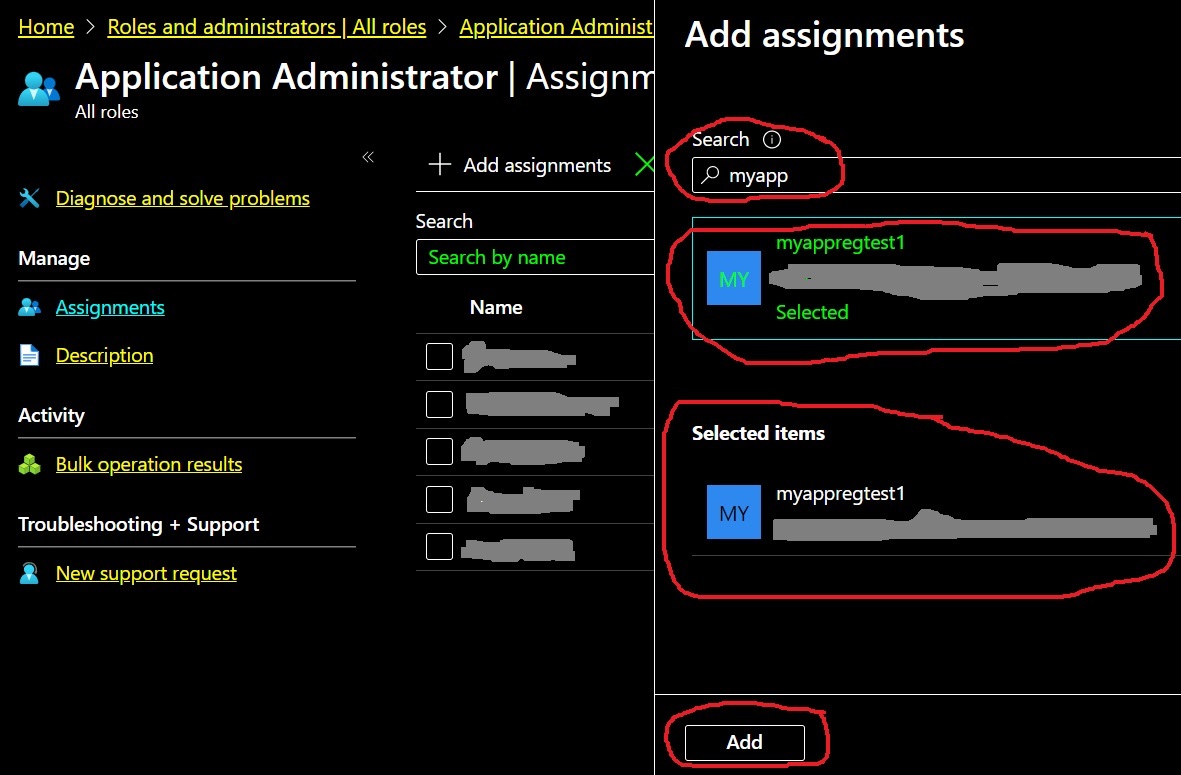
Step Three:
On the resulting “Add assignments” modal, search for the name of your app registration, then select it, and then click on the “Add” button as shown in the following screen shot.
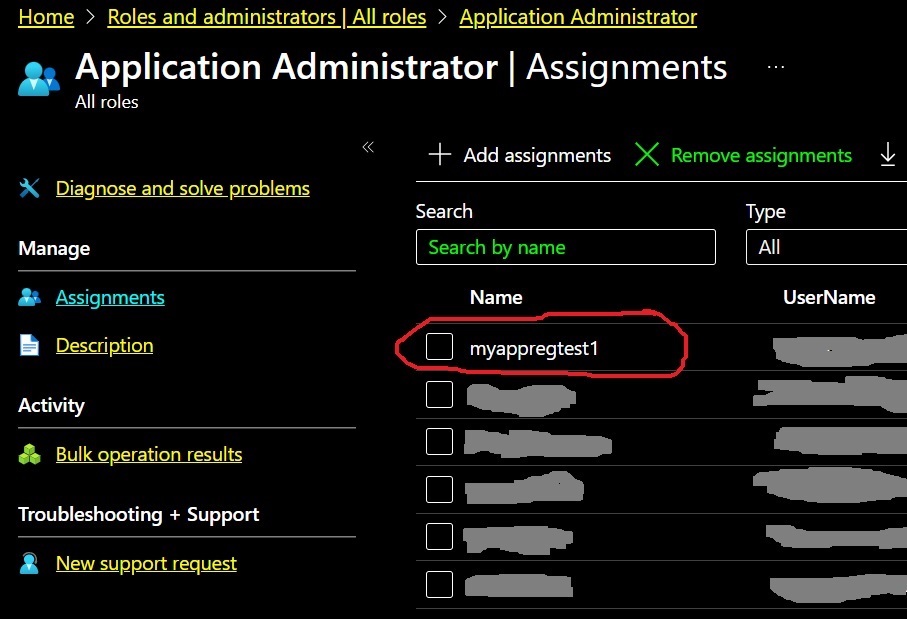
Your app registration’s name should now be listed in the list of assignees on the “Application Administrator Assignments” page as shown in the following screen shot.
Next Step
You are now ready to copy keys.yaml and config.yaml into the location given in the instructions for each example Azure appliance in the marketplace documentation.